Table of Contents
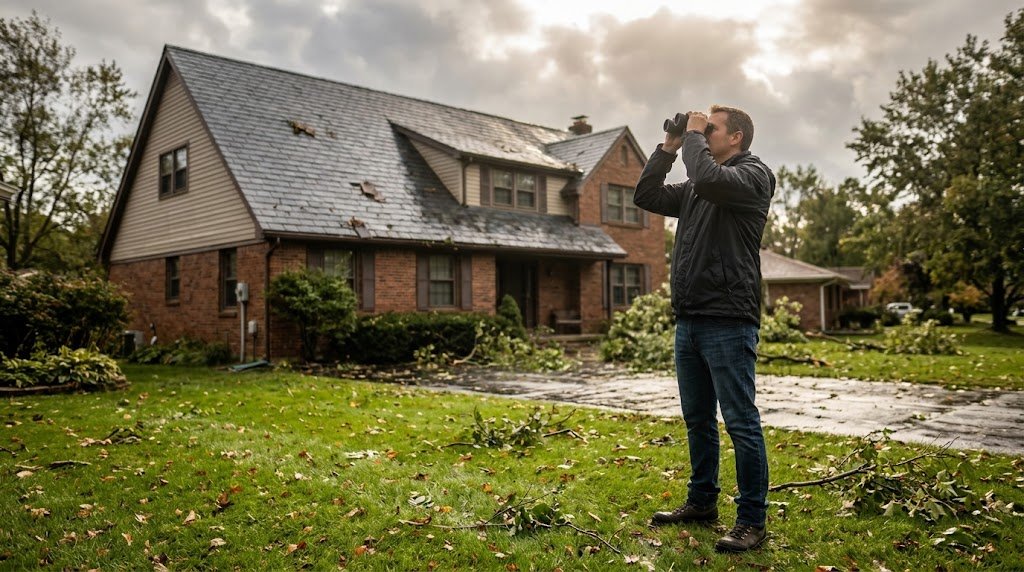
Homeowners can thoroughly evaluate their property's roof condition following a severe storm without ever leaving the ground. By systematically observing the ridge lines, slopes, gutters, and ground perimeter using binoculars and camera zoom, property owners can pinpoint storm damage, record vital evidence for insurance claims, and engage professional roofers safely.
The Principle of Ground-Level Inspection
UK storms regularly generate wind gusts exceeding 50 to 70 miles per hour, generating immense aerodynamic uplift over roof structures. The safest, most effective initial inspection method is visual observation from solid ground. Attempting to climb ladders in post-storm conditions—when surfaces are wet, wind gusts persist, and materials may be loose—is exceptionally dangerous and strongly discouraged by the Health and Safety Executive (HSE).
Essential Equipment for a Safe Check
To inspect your roof effectively from ground level, gather:
- Binoculars: A pair of 8x42 or 10x42 binoculars offers crisp optical clarity to distinguish fine cracks and slipped fixings.
- Smartphone or Digital Camera: Using optical zoom allows you to photograph suspect areas with date-stamped metadata for professional review or insurance records.
- High-Powered Torch: For safely inspecting the internal attic space.
1. Walk the Ground Perimeter First
Begin by walking the entire perimeter of the building, keeping a safe distance from eaves and overhangs. Look down at pathways, garden lawns, patios, and driveways for physical debris:
- Fragments of broken slate, terracotta clay, or concrete tile corners that have broken off and fallen.
- Dislodged mortar chunks originating from ridge or hip junctions.
- Gutter brackets, joint clips, or downpipe brackets torn free by wind gusts.
Discovering fragments on the ground confirms that high-level coverings have sustained impact or uplift, warranting a closer optical inspection above.
2. Inspecting the Ridge and Hip Lines
Step across the street or into the rear garden to obtain a clear line of sight to the roof apex. Using binoculars, trace the horizontal ridge line from end to end:
- Are all ridge tiles seated in a straight, uniform line?
- Are any tiles tilted, crooked, or shifted out of alignment?
- Can you observe open gaps where bedding mortar has been blown away?
Dislodged ridge tiles represent an acute hazard because subsequent wind gusts can roll them down the pitch, damaging secondary coverings or crashing into spaces below.
3. Scanning the Roof Slopes
Methodically scan the main roof planes in horizontal bands from eaves to ridge. Focus your attention on:
- Irregular Lines: Slipped slates will drop down into lower courses, creating a noticeable gap in the row above and an irregular jagged edge below.
- Colour Variations: Darker or lighter patches may indicate where an entire slate has blown off, exposing the underlying timber batten or felt.
- Lifted Edges: Check perimeter verge edges and eaves lines for tiles that appear raised or lifted off their battens.
4. Checking Guttering and Downpipe Runs
Severe storms often rip gutter brackets free from fascia boards, particularly when channels are weighed down by heavy rainwater and debris. Inspect the horizontal runs to ensure gutters are still securely attached and sloping smoothly towards outlets without sagging, bowing, or dangling loose sections.
5. Internal Loft Inspection
Once you complete your external ground-level assessment, carry out a cautious internal inspection of your loft space:
- Ensure the loft ladder is firmly secured before entering. Step strictly on secure joists or boarded flooring; never walk on exposed plasterboard ceilings.
- Switch off your torch momentarily and look towards the roof slopes. If you observe pinpricks or shafts of daylight penetrating through the rafters, slates or ridge mortar above have been displaced.
- Switch your torch on and inspect timber rafters, purlins, and insulation for fresh moisture stains or glistening water tracks.
Crucial Safety Directive: Do Not Climb on Roofs
Even if you spot an obviously slipped slate or blocked gutter, never climb onto the roof to attempt an immediate repair. Roof coverings destabilised by storm winds can collapse under human weight, and hidden structural damage creates unpredictable fall risks. Professional contractors use specialised scaffold towers, fall arrest harnesses, and cat ladders to execute safe storm repairs.
Next Steps Following Storm Damage
If you identify displaced slates, damaged gutters, or internal water ingress, take date-stamped photographs immediately and contact your building insurance provider alongside a reputable local roofing contractor. To review general statutory regulations governing domestic repair work, visit the official Planning Portal.
Sources & Regulatory References
Health and Safety Executive (HSE): INDG401 - Working at height: a brief guide
Met Office: Post-Storm Property Damage Assessment
Planning Portal: Guidance on Emergency and Routine Roof Works
Frequently Asked Questions
Discuss Your Building or Roofing Project
AKF Builders is based on Clapham High Street, providing building works, new roofs, roof repairs, and guttering across Clapham, Wandsworth, Battersea, and Balham.
Related Guides
Signs your gutters need replacing
Learn how to identify key warning signs that your property’s gutters have reached the...
Read guide →
What to do when your roof leaks
A practical step-by-step emergency checklist for UK homeowners experiencing an active...
Read guide →
Common causes of roof leaks in older terraced houses
A guide for owners of Victorian and Edwardian terraced properties exploring common ca...
Read guide →